Web Service Consumer Example
This example application illustrates how to consume a Web service by using the Web Service Consumer connector.
This connector encapsulates all the functionality related to consuming a Web service. Using the information contained in a Web service's WSDL, you can configure this connector for establishing the connection you need to consume a Web service from within your Mule application.
Assumptions
This example assumes that you are familiar with Mule Runtime and the Anypoint Studio 7 interface. This example also assumes you are familiar with XML coding and that you have a basic understanding of Mule flows, Simple Object Access Protocol (SOAP) as a Web service paradigm, and the practice of WSDL-first Web service development.
This document describes the details of the example within the context of Anypoint Studio.
Example Use Case
This example application simulates consuming a Web service that belongs to a T-Shirt retailer. Through HTTP requests, customers can check the availability of products and place purchase orders. When the application receives an order, it turns the JSON input into XML, adds an APIKey variable, and then sends the request to the Web service. The application then transforms the response from the Web service into JSON, builds a final response, and then sends the response to the requester.
When the application receives a list-inventory request, it forwards the request to the Web service, turns the response into JSON, and builds a final response for the requester.
Set Up and Run the Example
- Open the Web Service Consumer Example project in Anypoint Studio from Anypoint Exchange.
- In your application in Studio, click the Global Elements tab. Then double-click the HTTP Listener config global element to open its Global Element Properties dialog. Change the value of the Port field to
8081. - In the Package Explorer view in Studio, right-click the project name and then select Run As > Mule Application. Result: You can now send posts to your application via a browser extension such as Postman (for Google Chrome), or the
curlcommand-line utility. - To get an inventory list for the retailer, send a GET request to http://localhost:8081/inventory.
- To send an order, send a PUT request to the address http://localhost:8081/orders , setting the
Content-Typeheader toapplication/jsonand appending the following JSON:
{
  "email":"info@teeshirtshop.com",
  "address1":"Corrientes 316",
  "address2":"EP",
  "city":"Buenos Aires",
  "country":"Argentina",
  "name":"MuleSoft Argentina",
  "postalCode":"C1043AAQ",
  "size":"L",
  "stateOrProvince":"CABA"
}
How It Works
The Client-Side T-Shirt API example consumes a SOAP-based Web service, which accepts two different kinds of requests, each handled in a different flow, accessed through a different HTTP path.
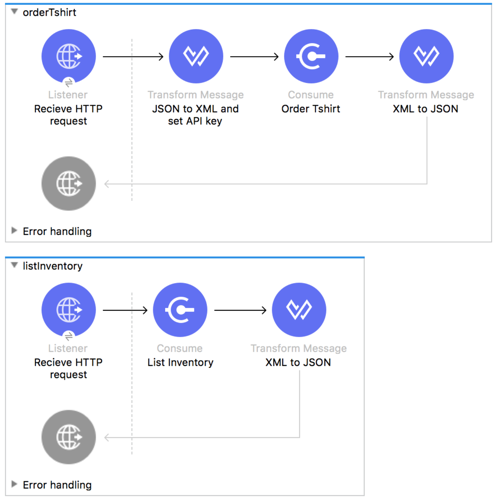
orderTshirt Flow
The orderTshirt flow accepts HTTP requests that are directed at its address, then turns the JSON payload into XML by using the DataWeave transformer. Because the consumed Web service requires an APIKey to be passed with every request, the flow creates the XML SOAP header hardcoding the APIKey value using DataWeave transformer. With the XML envelope built, the flow then contacts the Web service via the Web Service Consumer. This flow is also responsible for returning a response to the caller to confirm that the order was processed, so it transforms the resulting response to JSON format.
listInventory Flow
When issued a "list inventory" request, the flow directs it to the Web service via the Web service consumer, its response is then transformed into a JSON by the DataWeave transformer. Finally, the HTTP connector returns the response to the requester.