Sending JSON to a JMS Queue
home
Mule Studio offers components that are easy to use for connecting to JMS queues and topics. This example shows how to use Apache ActiveMQ, a leading open-source JMS implementation from Apache that supports the JMS 1.1 specification.
Assumptions
This document assumes that you are familiar with Mule and the Anypoint Studio interface. To increase your familiarity with Studio, consider completing one or more Anypoint Studio Tutorials. Further, this example assumes that you have ActiveMQ running on your machine.
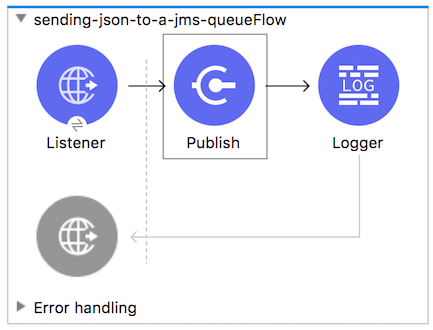
Sample Use Case
In this example, an HTTP request holding JSON sales data reaches an HTTP endpoint. A success message is logged and the data is added to a JMS queue, where you can view it in the ActiveMQ admin console.
Set Up and Run the Example
Complete the following procedure to create and then run this example in your own instance of Anypoint Studio.
- Open the Sending JSON Data to a JMS Queue project in Anypoint Studio from Anypoint Exchange. Do not run the application, yet.
- In your application in Studio, click the Global Elements tab. Double-click the HTTP Listener global element to open its Global Element Properties panel. Change the contents of the Port field to required HTTP port (e.g., 8081).
- Start the ActiveMQ server by navigating to the ActiveMQ home directory in a command terminal and then running the
bin/activemqstart command. As a result, ActiveMQ returns messages that are similar to these:INFO: Using java '/System/Library/Frameworks/JavaVM.framework/Home/bin/java' INFO: Starting - inspect logfiles specified in logging.properties and log4j.properties to get details INFO: pidfile created : . . . - Select
json-to-jms.xmlin the Package Explorer and click its Global Elements tab. Double-click Active MQ and set the value of Broker URL to your Active MQ broker URL. The default installation value istcp://localhost:61616. If you remove the default value and do not set a new value, the JMS elements use thevmprotocol. - In the Package Explorer, right-click the project and select Run As > Mule Application. Studio runs the application on the embedded server and connects to
localhoston the port on which the HTTP endpoint is configured. - Send JSON data to the URL by using REST Console or
curl. Use the following information to make your request.Request URI: [http://localhost:8081/sales](http://localhost:8081/sales) Request method: POST Body : {"ITEM_ID"= 001, "ITEM_NAME" = "Shirt", "QTY" = 1, "PRICE" = 20} - Log in to the ActiveMQ admin page at http://localhost:8161/admin/queues.jsp with the default username and password
admin. Check whether the message was added to the queue. In the ActiveMQ queue, click the Sales link and then the link under the Message ID column. You'll see the details of the message that was added to the JMS queue.