Proxying a REST API
home
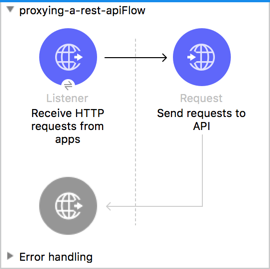
This example shows how to proxy your API. Applications send service requests to your proxy, which in turn calls the real API.
Prerequisites
This document assumes that you are familiar with REST, Mule, Anypoint connectors, Anypoint Studio, elements in a Mule flow, and global elements. You also need a Box login account or can create one.
You also need a REST API that has not been built to run on Mule Runtime.
Example Use Case
To demonstrate the basic procedure of creating a proxy application, this document uses the public Box API as an example REST API to stand in for any REST API that you have that you might want to proxy through a Mule application. The specific configuration for Box is summarized here, but you need to replace this with the corresponding information for your own RESTful services that you wish to proxy.
Set Up and Run the Example
To follow along with the steps in this example, you must have a box.com account, which you can create for free if you don't already have one.
Registering an App in the Box Developer Portal
The steps below are only needed in this particular example so that you can test your finished proxy for the Box API by simulating an API call from an application. They don't necessarily match the steps you need to carry out to test your own API.
- Go to Box's developer portal at developers.box.com.
- If you do not have an account, create one. If you have one, click My Apps in the upper-right corner of the page.
- Click Create a Box Application in the panel on the right. Give it any name, such as MyProxy, then select the Content API.
- Click Configure Application.
- Look for the client_id and the client_secret. Copy these to a safe place, as you will need them later.
- Add a redirect_url. For the purpose of this exercise, any HTTPS URL works, even https://www.salesforce.com.
Leave the box developer portal open for now. You can return here later to request an OAuth token. Because the OAuth token expires very quickly, it's best to build the flow before you request it.
If you're using HTTPS as the Box API requires, you must create a keystore file to certify the communication. This can be done using the keytool provided by Java, found in the bin directory of your Java installation. Navigate to this directory on your machine using the command line, then execute the following command to create a keystore file:
keytool -genkey -alias mule -keyalg RSA -keystore keystore.jksYou are prompted to create two passwords. Remember these. The command creates a .jks file in the local directory called keystore.jks. Drag this file into the /src/main/resources directory in Mule Studio's Package Explorer.
Building the Proxy in Studio
Build your proxy application in Anypoint Studio.
Your proxy application needs to:
- Accept incoming service calls from applications and route them to the Box API.
- Copy any message headers from the service call and pass them along to the Box API.
- Disable the default status code exception check to allow any error messages that the Box API returns to be passed on to the application.
- Capture message headers from the Box API's response and attach them to the response message.
- Route the response to the application that made the service call.
The following steps describe how to obtain a token for the Box API and use it to test the proxy you have just built by simulating an API call from an application.
- Open proxying-a-rest-api.xml in Anypoint Studio. Replace the values ${keystore.key} and ${keystore.password} with the corresponding data you entered while creating keystore using the command line - see the previous section.
- In your application in Studio, click the Global Elements tab. Double-click the HTTP Listener global element to open its Global Element Properties panel. Change the contents of the port field to required HTTP port for example 8081.
- Deploy your Mule Project to the embedded Mule server by right-clicking the project in the Package Explorer, then selecting Run As... > Mule Application.
- In any Web browser, enter the following URL: http://localhost:8081/oauth2/authorize?response_type=code= Replace in the URL above with the client_id provided by Box when you registered your new app.
- Box prompts you to log in with your username and password. You can use your personal credentials or create a new test account.
- Before you click Grant access to Box, you should be ready for the following steps, as the token code you obtain expires in only 30 seconds.Be ready to send http://localhost:8081/oauth2/token as an HTTP POST request that includes a body with the properties below: Attribute Valuegrant_type authorization_codecodeclient_idclient_secret To send this request, use a browser extension such as Advanced Rest Client (Google Chrome), or the curl command line utility.
- After you prepare for the next step, go back to the browser page where you entered your Box credentials and click Grant access to Box.
- The browser redirects to the page you set as the redirect on your Box app. For this exercise, the page itself is irrelevant, but the full URL includes an extra parameter named code. For example: https://www.salesforce.com/?state==
- Copy the value of from the URL and paste it into your POST request so that its properties are the following: Attribute Valuegrant_type authorization_codecodeclient_idclient_secret
- Send the request.
- This POST request returns a JSON object with several fields. Copy the value corresponding to access_token, as you need it soon. The access_token lasts for an hour before expiring.
- Now you can make proper requests to your proxy. You must include access_token on every request as a header with the name Authorization.Header ValueAuthorization Bearer The value of the header must include the word Bearer followed by a space and then the access_token. For example:Authorization=Bearer 1234123412341234
Try making a GET request to http://localhost:8081/2.0/folders/0, remembering to include the Authorization header.
How it Works
Follow the anatomy described here to build a proxy application in Mule Studio that abstracts your API to a new layer. Your proxy application needs to:
- Accept incoming service calls from applications and route them to the URI of your target API.
- Copy any message headers from the service call and pass them along to your API.
- Avoid passing internal Mule headers both to the API and back to the requester.
- Add a flag that ensures that your target API's HTTP status codes are returned to the requesting app, and not overwritten by the proxy's own status codes.
- Capture message headers from your API's response and attach them to the response message.
- Route the response to the application that made the service call.
Documentation
Studio includes a feature that enables you to easily export all the documentation you have recorded for your project. Whenever you want to share your project with others outside the Studio environment, you can export the project's documentation to print, email or share online. Studio's auto-generated documentation includes:
- A visual diagram of the flows in your application
- The XML configuration which corresponds to each flow in your application
- The text you entered in the Notes tab of any building block in your flow