Adding a new customer to Workday Revenue Management
home
The Workday Anypoint Connector facilitates connections between Mule integration applications and Workday by making API calls to the Workday Web Services. This example shows you how to use this connector in an integration application that adds a customer to the Workday Revenue Management Console.
Assumptions
This document assumes that you are familiar with Mule and the Anypoint™ Studio interface. Further, this example assumes that you have a basic understanding of Mule flows, Mule Global Elements, and Anypoint DataWeave.
This document describes the details of the example within the context of Anypoint Studio.
Example Use Case
The application accepts an XML message that contains the required customer information: customer name, status, and category. It parses this XML using the DataWeave transformer and creates a new customer record in a Workday instance.
Set Up and Run the Example
Complete the following procedure to create, then run this example in your own instance of Anypoint Studio.
- Open the Example project in Anypoint Studio from Anypoint Exchange. Do not run the application.
- In your application in Studio, click the Global Elements tab. Double-click the HTTP Listener global element to open its Global Element Properties panel. Change the contents of the port field to required HTTP port (e.g. 9090).
- In your application in Studio, click the Global Elements tab. Double-click the Workday Connector global element to open its Global Element Properties panel. Change the contents of the user, password, tenant and, hostname fields to your account-specific values. Then, click OK to save your changes.
- In the Package Explorer, right-click the
adding-a-new-customer-to-workday-revenue-managementproject name, and then select Run As > Mule Application. Studio runs the application on the embedded server. - Make an HTTP POST request to http://localhost:9090/ with the 'Content-Type' header set as 'application/xml' and the request body as follows:
 <?xml version="1.0" encoding="UTF-8"?>
 <root>
     <Account>
         <CustomerName>John Doe</CustomerName>
         <BusinessEntityName>John Doe</BusinessEntityName>
         <Customer_Category_Reference_Type>Customer_Category_ID</Customer_Category_Reference_Type>
         <Customer_Category_Reference_Value>CUSTOMER_CATEGORY-5</Customer_Category_Reference_Value>
         <Customer_Status_Reference_Type>Business_Entity_Status_Value_ID</Customer_Status_Reference_Type>
         <Customer_Status_Reference_Value>ACTIVE</Customer_Status_Reference_Value>
     </Account>
 </root>
To send this request, use a browser extension such as Advanced Rest Client (Google Chrome), or the curl command line utility.
6. Log in to your Workday account. Navigate to View Customer Report and enter John Doe in the search field. Verify that the customer was added.
How it Works
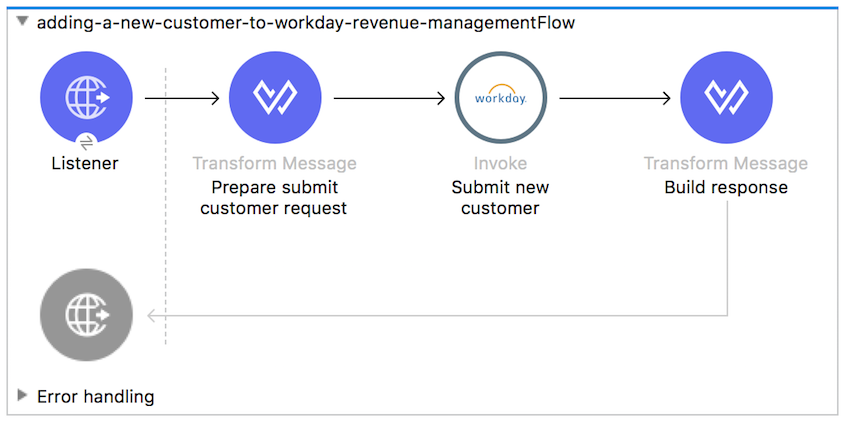
Using a single flow with four elements, this application accepts XML that contains customer information, and then uploads a customer to Workday.
The HTTP connector listens to POST requests at the predefined URL. When such a request arrives, the HTTP connector passes the content to the Anypoint DataWeave transformer. This transformer converts the message into a different XML message that is in a format required for the Workday request. After this conversion, the application uses the Workday Connector to push data into your Workday system. The connector's configuration specifies the operation – Put customer.